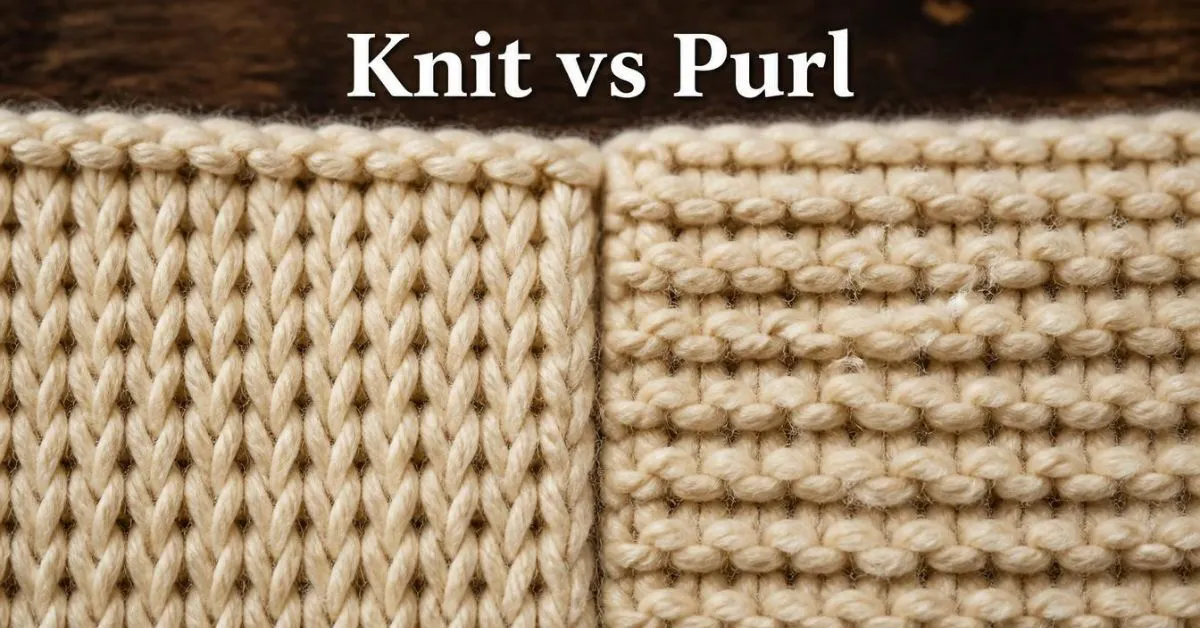
Knit vs purl describes the two basic ways to work a knitting stitch. A knit stitch usually looks like a smooth V, while a purl stitch looks like a raised horizontal bump. They are closely related: the back of a knit looks like a purl, and the back of a purl looks like a knit.
Key Takeaways
- Knit stitches look like Vs.
- Purl stitches look like bumps or horizontal bars.
- Knit and purl are two sides of the same basic stitch structure.
- The yarn is normally behind the work for a knit and in front for a purl.
- Combining knit and purl creates patterns such as stockinette, garter stitch, and ribbing.
- Learning to recognize stitches helps you read patterns and catch mistakes.
Knit vs Purl at a Glance
If you are completely new to knitting, this quick comparison gives you the main difference before you learn the details.
| Feature | Knit Stitch | Purl Stitch |
| Appearance | Smooth V | Raised bump or bar |
| Yarn position | Behind the work | In front of the work |
| Abbreviation | K | P |
| Texture | Smoother face | More textured face |
| Easy clue | Think “V” | Think “bump” |
| Common patterns | Stockinette, garter, ribbing | Stockinette, ribbing, seed stitch |
The most useful beginner rule is simple:
V = knit
Bump = purl
This visual shortcut is one of the easiest ways to start reading your knitting.
What Is a Knit Stitch?
A knit stitch is one of the two foundation stitches used in knitting.
When you look at the knit side of the fabric, each stitch usually forms a small V shape. When several knit stitches are stacked in columns, you get the smooth surface commonly associated with stockinette fabric.
The knit stitch is often the first stitch beginners learn because its movement can feel more natural at first. But its real importance goes beyond being a beginner stitch. Knit stitches can be combined with purls in countless ways to create different textures and patterns.
What Does a Knit Stitch Look Like?
Look closely at the fabric and you will see something like:
V V V V V
The Vs will interlock as the fabric grows.
A helpful memory trick is to imagine the neckline of a V-neck sweater. The shape can remind you that a knit stitch looks like a V.
What Is a Purl Stitch?
A purl stitch is the second basic knitting stitch.
Instead of producing a smooth V toward you, a purl creates a raised horizontal bump or bar.
The purl can feel slightly strange when you first learn it because the yarn changes position and the needle movement feels different from knitting. In a standard purl, the working yarn is brought to the front of the work before the stitch is worked.
What Does a Purl Stitch Look Like?
A purl looks roughly like a small horizontal bump:
The exact shape depends on your yarn, tension, and fabric, but the raised bump is usually easy to recognize once you know what to look for.
Think:
Purl = bump
That one word can save a beginner a lot of confusion.
Why Do Knit & Purl Look Like Opposites?
Here is one of the most important things to understand about knit vs purl:
A knit stitch viewed from one side looks like a purl from the other side.
Likewise, a purl viewed from the opposite side looks like a knit.
So knit and purl are not two completely unrelated structures. They are closely connected views of the same basic knitted loop.
This explains something that often confuses new knitters.
You might knit several stitches, turn your project around, and suddenly see bumps instead of Vs.
That does not mean you accidentally purled.
You are simply looking at the other side of your knitted fabric.
Knit vs Purl: How Are They Worked Differently?
The biggest physical difference is the position of the working yarn and the direction in which the needle enters the stitch.
How a Knit Is Worked
For a standard knit stitch:
- Hold the working yarn behind the work.
- Insert the right needle into the stitch on the left needle.
- Wrap the yarn around the right needle.
- Pull the new loop through.
- Move the old stitch off the left needle.
The exact hand position can vary depending on whether you use English, Continental, or another knitting style, but the basic stitch structure remains the same.
How a Purl Is Worked
For a standard purl stitch:
- Bring the working yarn to the front.
- Insert the right needle into the stitch according to the standard purl motion.
- Wrap the yarn around the needle.
- Pull the new loop through.
- Slide the old stitch off the left needle.
The key beginner difference is easy to remember:
Knit → yarn behind
Purl → yarn in front
How to Tell a Knit From a Purl
Learning to read your knitting is one of the most useful skills you can develop.
Instead of asking, “What did I do on the previous row?” you can look at the fabric and figure out what stitch you are seeing.
Step 1: Look for a V
If the stitch facing you has a smooth V shape, it is showing its knit face.
Step 2: Look for a Bump
If you see a raised horizontal bar or bump, it is showing its purl face.
Step 3: Look at the Column
When working ribbing or another repeating pattern, follow the column of stitches downward.
If the column consists of Vs, you are looking at knit stitches.
If the column consists of bumps, you are looking at purl stitches.
Step 4: Stretch the Fabric Slightly
If the stitches are difficult to see, gently stretch the fabric vertically.
A little tension can make the V shapes and purl bumps easier to distinguish.
How to Tell Knit and Purl Stitches on the Needle
This can be harder than identifying finished fabric.
Before working the next stitch, look carefully at the stitch sitting on the needle.
A knit-oriented stitch generally looks cleaner and more like a simple loop around the needle.
A purl-oriented stitch shows a horizontal bar or bump toward the front of the needle.
If you are unsure, gently pull the fabric downward and examine the stitch directly below the needle. This can make its structure much easier to see.
With practice, you will stop needing to think about it.
You will simply look at the stitch and know.
Why Does Knit vs Purl Matter?
You might wonder why it is important to know the difference if both stitches are so closely related.
The answer is patterns.
Knitting patterns use knit and purl in different combinations to control the texture, stretch, appearance, and structure of the fabric.
For example:
- Knit every row can create garter stitch when working flat.
- Knit one row and purl the next creates stockinette when working flat.
- Knit and purl in repeating columns creates ribbing.
- More complex arrangements create textured patterns such as seed stitch and many other designs.
Once you understand knit and purl, these patterns stop looking like random letters and numbers.
What Happens When You Knit Every Row?
When working flat, knitting every row creates garter stitch.
Garter stitch produces horizontal ridges and is generally reversible.
For a beginner, it is one of the easiest ways to practice keeping consistent tension while becoming comfortable with the knit stitch.
One important detail: working in the round is different because you are continually working from the same side. So “knit every row” and “knit every round” do not produce the same fabric.
What Happens When You Knit One Row and Purl the Next?
When working flat, alternating a knit row with a purl row creates stockinette stitch.
The result is:
- Smooth Vs on one side
- Purl bumps on the other side
Stockinette is one of the most recognizable knitted fabrics.
It is also important to know that stockinette naturally tends to curl at its edges. That behavior is part of the stitch structure, not automatically a sign that you made a mistake.
How Do Knit and Purl Create Ribbing?
Ribbing is made by alternating knit and purl stitches within a row.
For example:
K1, P1, K1, P1
creates a simple 1×1 rib.
Another common pattern is:
K2, P2, K2, P2
which creates 2×2 ribbing.
Ribbing creates alternating columns of knit and purl stitches. Because of its structure and elasticity, it is commonly used for areas such as cuffs, waistbands, sock tops, and hat edges.
Knit vs Purl When Reading a Pattern
Knitting patterns often use abbreviations.
The most common ones are:
- K = knit
- P = purl
So if a pattern says:
K2, P2
you knit two stitches, then purl two stitches, and repeat the sequence as instructed.
A pattern might also say:
“Knit the knits and purl the purls.”
This means you should look at the stitches already on your work.
If you see a knit-looking V, knit it.
If you see a purl-looking bump, purl it.
This technique is particularly useful when working ribbing and other stitch patterns where the fabric itself tells you what comes next.
A Simple Example for Beginners
Suppose you cast on 8 stitches and want to practice recognizing both stitches.
Try this simple sequence:
Row 1: K1, P1, K1, P1, K1, P1, K1, P1
Row 2: Work the stitches as they appear.
As the fabric grows, you should begin seeing alternating columns:
V | bump | V | bump
This gives you a small practice swatch for learning how knit and purl stitches look next to each other.
Do not worry about making the swatch perfect.
The goal is simply to train your eyes.
Common Knit and Purl Mistakes
Mistake 1: Thinking Every Bump Is a Mistake
A purl bump is a normal part of knitted fabric.
If you turn stockinette over, you should expect to see bumps.
Mistake 2: Forgetting Which Side You Are Looking At
Always check the side of the fabric before deciding whether something is a knit or purl.
Remember that the reverse side changes the appearance.
Mistake 3: Moving the Yarn to the Wrong Position
For standard knitting:
Knit = yarn back
Purl = yarn front
Moving the yarn incorrectly can create an accidental yarn-over or change the structure of your work.
Mistake 4: Following the Pattern Without Looking at the Fabric
Beginners sometimes focus only on the written instructions.
Learning to look at the actual stitches gives you another way to catch mistakes.
Which Is Easier: Knit or Purl?
There is no universal answer.
Many beginners learn the knit stitch first and find it easier initially. The purl can feel awkward because the yarn is brought forward and the hand movement differs.
But after enough practice, both become routine.
Instead of worrying about which one is easier, focus on learning these two visual rules:
Knit = V
Purl = bump
Once your eyes recognize the stitches, your hands usually become more confident too.
FAQs:
Is purl just the reverse of knit?
Knit and purl are closely related and can be viewed as opposite faces of the same basic knitted structure. A knit face appears as a purl bump from the other side, while a purl face appears as a knit V from the reverse side.
What does a knit stitch look like?
A knit stitch usually looks like a small, smooth V on the side facing you. When several knit stitches are stacked, the Vs form vertical columns across the fabric. This is the familiar smooth surface seen on the knit side of stockinette.
What does a purl stitch look like?
A purl stitch usually looks like a raised horizontal bump or bar. When many purls are worked together, these bumps create a textured surface. The purl appearance is especially easy to see on the reverse side of stockinette.
Should I knit or purl when I see a V?
If your pattern tells you to knit the knits and purl the purls, a V-shaped knit face means you should knit that stitch. This technique is useful for maintaining ribbing and other repeating stitch patterns.
What happens if I knit every row?
When knitting flat, knitting every row produces garter stitch. It creates horizontal ridges and a reversible fabric. Working in the round is different because you are always working from the same side.
Why do my knit and purl stitches look different from tutorials?
Small differences are normal. Yarn weight, needle size, tension, knitting style, and how tightly you hold the yarn can all affect how your stitches look. Focus first on recognizing the basic V and bump shapes rather than trying to make your stitches look exactly like someone else’s.
Conclusion:
Understanding knit vs purl becomes much easier when you stop thinking of them as two complicated techniques and start looking at the shapes they create.
Remember the simplest rule:
Knit = V
Purl = bump
Knit and purl are the two basic building blocks behind many familiar knitting patterns. By combining them, you can create stockinette, garter stitch, ribbing, seed stitch, and countless textured designs.
If you are a beginner, make a small practice swatch and spend a few minutes identifying each stitch. Look at the front, turn the fabric over, and notice how the V becomes a bump.
Once your eyes learn that relationship, reading knitting patterns becomes much easier and you can start using your fabric itself as a guide instead of relying only on written instructions.

Olivia Smith is a professional author at ReplyGenius.com, where I create clear and engaging content on communication and writing.